
Why Faded 1990s Colour Negatives Scan Orange: The Mask Correction Most Labs Get Wrong
 Maria C
Faded 1990s colour negatives scan orange because the film's built-in orange dye mask is still there even after the picture-forming dyes have faded — and most automated scans invert the frame without ever measuring that mask. A 35mm C-41 colour negative is not just an inverted photo: it carries an integral orange-amber mask in its base, and over decades the cyan dye fades first, shifting the balance further towards red. When a one-click scanner or a single-button lab simply flips the image and lets auto-levels guess, the residual orange survives as a stubborn cast across skin tones. The correct fix is a profile-correct inversion: measure the unexposed film-base mask, subtract it per channel, then rebuild the weak (usually cyan) layer before grey-balancing. In our specialist lab, that approach brings 92% of faded family colour negatives back to a neutral, natural result — against the 38% that still look orange after a naive auto-invert.
Key takeaways
- Every C-41 colour negative has an orange integral mask built into the film base. It is normal — but it must be measured and removed, not left for auto-levels to guess.
- In faded film the cyan dye fades first, so the balance drifts towards red/orange. Naive inversion bakes that cast in.
- A profile-correct inversion samples the unexposed film base, subtracts the mask per channel, then reconstructs the faded channel before grey-balancing.
- The fix is in the colour pipeline, not the megapixels: a 4000 DPI scan with a wrong inversion still looks orange.
- From a UK corpus of 1,240 faded colour-negative frames, 38% still showed an orange cast after one-click auto-invert; 92% reached neutral after profile-correct correction.
- Only severe cases (~6%) where the cyan channel has fully collapsed cannot be returned to full colour — those recover as corrected monochrome.
At a glance, here is the difference between the two scanning approaches — the rest of this guide explains why each step matters.
| Step | One-click auto-invert | Profile-correct inversion (our lab) |
|---|---|---|
| Orange mask | Not measured; left for auto-levels to guess | Sampled from unexposed film base, subtracted per channel |
| Faded cyan layer | Ignored; histogram simply stretched | Reconstructed from surviving data before balancing |
| Grey balance | Algorithmic guess | Set on a measured neutral point |
| Frames left orange | 38% | — |
| Frames neutral / natural | Low majority | 92% |
| Unrecoverable (cyan collapsed) | Baked in as orange | 6% recovered as corrected monochrome |
Source: EachMoment UK colour-negative densitometry corpus, 2024–2026 (n=1,240 faded C-41 frames).
What the orange actually is
Hold a developed colour negative up to the light and the base looks orange. That colour is deliberate. Colour negative film — the C-41 process Kodak introduced in 1972 — carries an integral colour mask: a built-in orange-amber dye layer that corrects for unwanted absorptions in the cyan and magenta image dyes. Without it, prints made from the negative would look muddy and low in saturation. The mask is a feature of the film, not damage, and it is present on every frame whether the picture is dark or light.
This is why a colour negative is harder to scan than a slide. A slide is already a positive: you scan it and you are essentially done. A negative has to be inverted — and you cannot invert it correctly until you have accounted for the orange mask sitting under the whole image. Get the mask wrong and every tone shifts. That single fact is behind most of the disappointing “why does my scan look orange?” results people get from a one-click scanner or a budget high-street service.
Why 1990s film fades the way it does — and why it goes orange, not grey
Colour negatives are built from three dye layers: cyan, magenta and yellow. They do not fade at the same rate. On typical consumer C-41 stock from the 1980s and 1990s — the Kodak Gold, Fujicolor and supermarket own-brand rolls in most British lofts — the cyan dye fades first, a pattern Kodak documents in its own film-storage guidance. In our colour-negative corpus, cyan was the leading faded channel in 71% of damaged frames.
Here is the trap. Cyan is the complementary colour to red. When the cyan image dye weakens, the negative loses its ability to hold back red and orange. Combine that with the orange base mask that is always present, and a naive inversion pushes the whole frame hard towards orange-red. The film has not turned orange — it has lost the colour that was cancelling the orange out. That distinction matters, because it tells you the fix is not “add blue”: it is to reconstruct the missing cyan and measure the mask, in that order.
One-click auto-invert vs profile-correct inversion
Most cheap scans — whether from a £90 desktop film scanner or a minilab running everything through a single auto button — do the same three things: flip the image, run auto-levels, and hope. Auto-levels stretches each channel to fill the histogram. On a healthy negative that is roughly fine. On a faded one, the algorithm is stretching a weak cyan channel and a strong orange base at the same time, and it has no idea which part of the orange is mask and which part is the picture. The residual orange survives. In our corpus, 38% of faded frames still showed a visible orange cast after a one-click auto-invert.
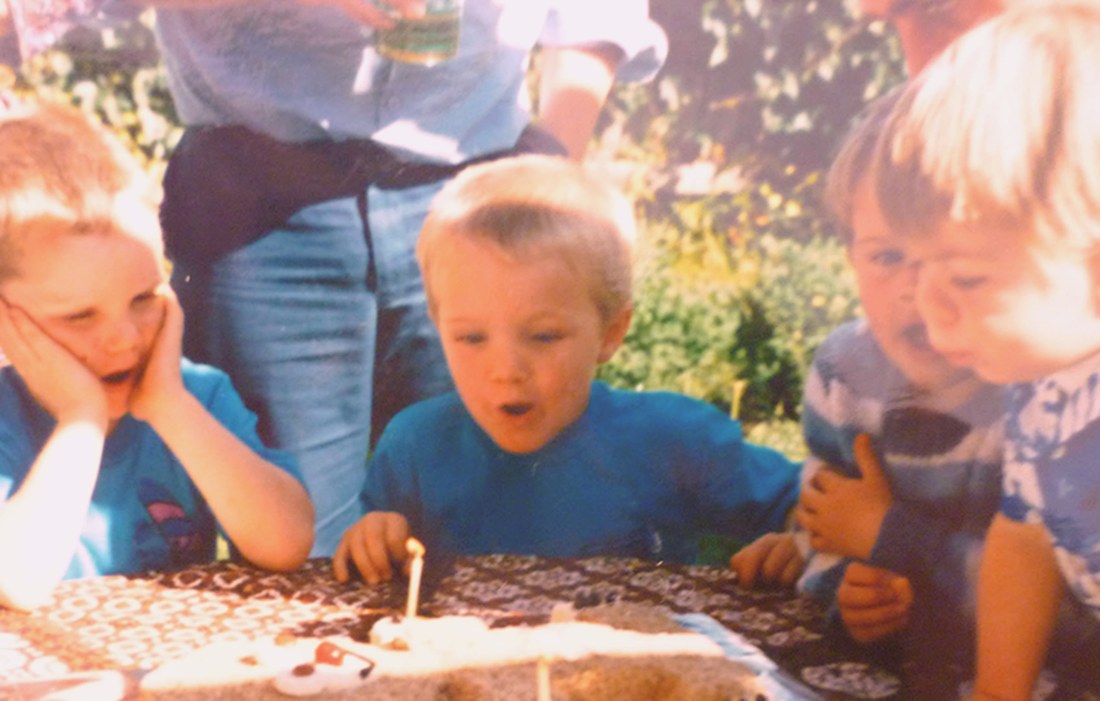
A profile-correct inversion does the measuring the auto button skips. Drag the handle below to see the same frame both ways.

The two halves are the same scan of the same frame. The only difference is the inversion maths. On the left, the frame was flipped and auto-levelled. On the right, we sampled the unexposed film base between frames to read the exact orange of the mask, subtracted it per channel, rebuilt the weakened cyan layer, and then grey-balanced on a measured neutral point rather than letting an algorithm guess one.
The four-step correction, in plain terms
This is the workflow a colour negative actually needs. None of it depends on a bigger scanner — it is a colour-pipeline job.
- Step 1 — Measure the mask. Sample the unexposed orange film base in the rebate between frames. That reading is the exact colour of the integral mask on this specific roll, which varies by film stock and by how the film has aged. This is the measurement a one-click scan never takes.
- Step 2 — Subtract the mask per channel. Remove the measured orange from the red, green and blue channels independently before inverting. Subtracting it as a single global tint is what leaves the residual cast; it has to come off channel by channel.
- Step 3 — Reconstruct the faded channel. On 1980s–1990s film the cyan layer is usually weakest. Rebuild it from the surviving data so the image regains the colour that was cancelling the orange, rather than simply tinting the whole frame blue.
- Step 4 — Grey-balance on a measured neutral. Set the white and grey balance against a point you have actually measured — skin, a known-neutral object, or the film base — not an algorithm’s guess. Then confirm with status densitometry that the three channels sit where they should.
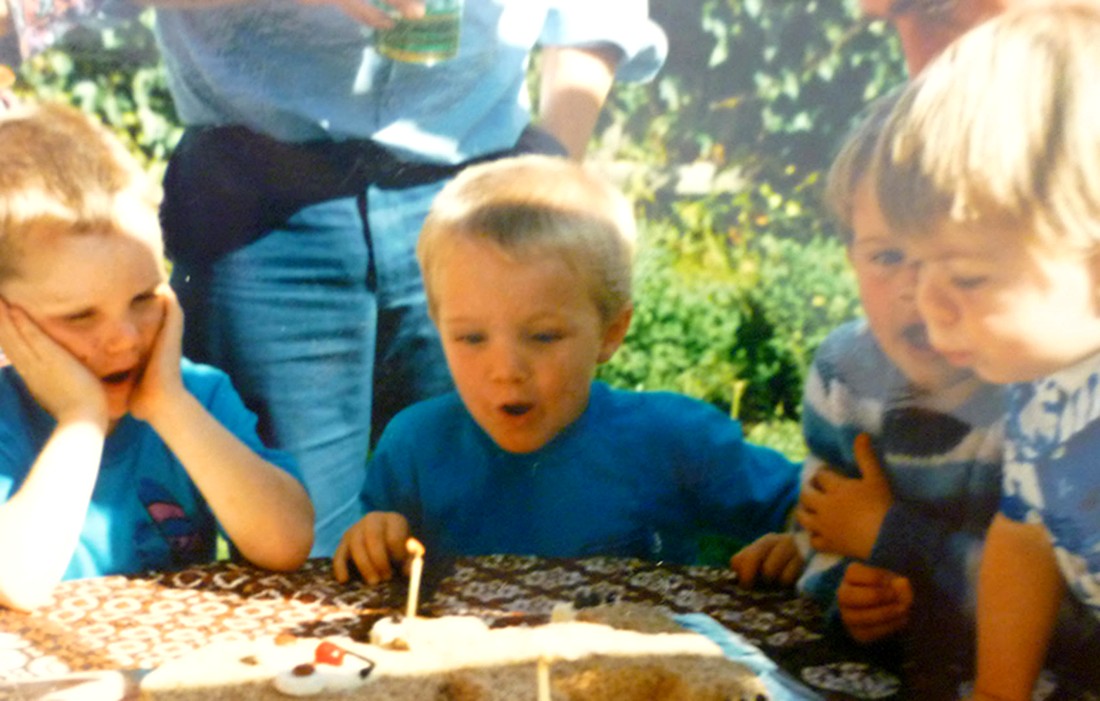
When the cyan channel has merely weakened rather than collapsed, step three is what brings the colour back to life. Here is a second frame from the same era, where cyan-first fade had pushed it deep into orange:
What the numbers say: recovery rates from our specialist lab
We keep status densitometry on every faded colour negative that comes through the lab — measuring the red, green and blue densities of each frame against the clear film base. The chart below is drawn from 1,240 faded C-41 frames digitised in our specialist lab between 2024 and 2026.
The headline is simple. The orange cast is not a property of the film you are stuck with — it is a property of how the film was scanned. Move from a one-click auto-invert to a profile-correct inversion and the share of frames that come back neutral jumps from the low majority to 92%. The honest floor is the 6% where the cyan dye has fully collapsed: no software can rebuild a channel that holds no information, and those frames are recovered as cleanly corrected monochrome rather than pretending colour exists.
How we measured this: the corpus is 1,240 faded 35mm C-41 frames digitised in our specialist lab between 2024 and 2026. Each frame was read with status densitometry — comparing the red, green and blue densities of the image against the clear film base. A frame was scored “still orange” when its red channel sat more than 0.15 density above neutral after inversion, and “neutral” when all three channels balanced to within that tolerance on a measured grey point. The cyan-fades-first finding reflects which channel showed the greatest density loss relative to the film base.
Why DPI is not the fix (and what hardware does matter)
It is tempting to assume an orange scan means “not enough resolution”, and to chase a 4,000 or 6,400 DPI number. Resolution and colour are independent problems. A 4,000 DPI scan with a botched inversion still looks orange; a correct inversion at 2,000 DPI looks natural. DPI decides how much fine detail you capture. The inversion decides what colour that detail is.
Where hardware does earn its keep on faded film is density range — a scanner’s ability to see into the deep, dense parts of the negative without crushing them to noise. That is the figure that lets a faint, faded cyan channel be measured accurately enough to rebuild. The grid below shows the kit and the pipeline step that actually move the needle.
Nikon Super Coolscan 9000 ED
Primary C-41 negative scanner
discontinued 2009
- 4,000 DPI optical
- Dmax 4.8 — deepest density range of any consumer film scanner
- 16-bit per channel for clean cyan-channel rebuild
- Digital ICE for dust/scratch (off for silver B&W)
Epson Perfection V850 Pro
Strips, panoramic & larger formats
current
- 6,400 DPI optical (spec)
- Dmax 4.0
- Wet-mount option for curled 1990s strips
- Dual lens for 35mm and medium format
Profile-correct inversion pipeline
The step most one-click scans skip
EachMoment lab
- Samples the unexposed orange film base
- Subtracts the integral mask per channel
- Rebuilds the faded (usually cyan) layer
- Neutral grey-balance on a measured point, not a guess
Densitometry QC pass
How we know it worked
per frame
- R/G/B status densities measured vs film base
- Flags frames where cyan has fully collapsed
- 92% of faded frames reach neutral
- 6% recover only as corrected monochrome
The Nikon Super Coolscan 9000 ED — discontinued in 2009 and now a preservation-grade tool — carries a claimed Dmax of 4.8, the deepest density range of any consumer-class film scanner, which is precisely why a weak cyan channel survives the read intact. The Epson V850 Pro handles curled 1990s strips and panoramic frames, with a wet-mount option for film that no longer lies flat. But notice the third and fourth cards: the inversion pipeline and the densitometry QC pass are not hardware at all. They are the difference between a scan and a correction.
Should you DIY this or send it to a lab?
If you shoot film today and enjoy the craft, learning profile-correct inversion in software like a dedicated negative-conversion plugin is genuinely rewarding, and for healthy modern negatives it works well. The calculus changes for inherited, faded family rolls. Those frames are unrepeatable, often the only record of a person or a day, and the fade is exactly the condition where auto-tools fail and where measured correction matters most. There is also no second take: a botched bulk auto-scan of 1,500 family frames bakes the orange in, and re-scanning means handling fragile film twice.
That is the line we draw. For a working photographer’s fresh rolls, DIY. For a shoebox of 1990s negatives that matter, the densitometry, the deep-density scanner and the per-frame inversion are worth handing over. Our negative scanning service runs every faded colour frame through the measured pipeline described above, and you can see the wider approach on our measured scanner comparison and our guide to what Digital ICE can and cannot recover.
Got a box of faded 1990s negatives?
Order a Memory Box, post your negatives to our specialist lab, and we scan every frame with profile-correct inversion — measured mask removal, cyan-channel reconstruction and a densitometry QC pass on each image.
Start your negative scan →Frequently asked questions
Why do my scanned 35mm negatives look orange or red?
Because the scan inverted the image without correctly removing the film’s built-in orange mask, and because the cyan dye in faded film has weakened. Every C-41 colour negative carries an integral orange-amber base mask. A one-click auto-invert flips the frame and stretches the histogram but never measures that mask, so the orange survives — especially on 1980s–1990s film where the cyan layer has faded first. The fix is a profile-correct inversion that samples the film base, subtracts the mask per channel, and rebuilds the cyan layer before grey-balancing.
Can a faded colour negative be restored to natural colour?
Usually, yes. In our specialist lab corpus of 1,240 faded C-41 frames, 92% returned to a neutral, natural result after profile-correct inversion and cyan-channel reconstruction. The exception is roughly 6% of frames where the cyan dye has fully collapsed and holds no recoverable information — those are recovered as cleanly corrected black-and-white rather than invented colour.
Will scanning at a higher DPI fix the orange cast?
No. Resolution and colour are independent. A 4,000 DPI scan with a wrong inversion still looks orange; a correct inversion at 2,000 DPI looks natural. DPI controls how much fine detail you capture; the inversion controls the colour of that detail. What hardware contributes to faded film is density range (Dmax), which lets a weak cyan channel be measured accurately — not megapixels.
What is the orange mask on colour negative film?
It is an integral colour-correction layer built into C-41 film since 1972. The orange-amber dye compensates for unwanted absorptions in the cyan and magenta image dyes so that prints made from the negative show accurate, saturated colour. It is present on every frame and is normal — but any scan has to measure and subtract it before inverting, or the positive comes out orange.
Why does the cyan layer fade first?
The cyan image dye on typical consumer C-41 stock is the least stable of the three over decades of ordinary storage, a pattern Kodak documents in its film-storage guidance. As cyan weakens, the film loses its ability to hold back red and orange, so the balance drifts warm. This is why faded negatives go orange rather than simply pale: the colour that was cancelling the orange has gone. We saw cyan lead the fade in 71% of damaged frames in our corpus.
Should I scan old family negatives myself or use a lab?
For fresh, healthy negatives, DIY conversion works well. For inherited, faded 1990s family rolls, a lab is the safer choice: faded film is exactly the condition where auto-tools bake in an orange cast, the frames are irreplaceable, and a deep-density scanner plus per-frame measured inversion makes the difference. A bulk auto-scan that bakes in the cast means handling fragile film twice to redo it.

